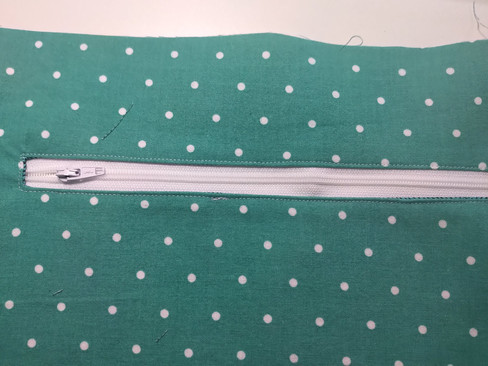
Pockets! Zippered Welt Pocket
- rebeccajeancreates
- Jan 21, 2024
- 3 min read
Pockets make everything better so today we are going to make a welt zipper pocket. A welt pocket is a pocket that is set into the fabric. Common examples of welt pockets are seen in jacket pockets, back pockets in trousers, and are very common in bags. There are many types of welt pockets but for bag making zipper pockets are very popular. Zipper pockets can be used on the inside of the bag or the outside of the bag as long as there is a lining.

I add a zipper pocket to almost every bag that I make. These pockets are easy to add even if they are not included in a pattern, with a couple of measurements you can add your own pocket to any bag. I am going to add a welt pocket to the laptop bag, found here. It is always easier to add a pocket before sewing any other seams, this way you have a flat piece and you do not have to worry about cutting or sewing any other layers.
Materials:
Stable woven fabric (quilting cotton is great)- 11” by 14.5”
9” long zipper
I am going to show the measurements I used for the laptop bag but this pocket can easily be changed based on the size of your bag. I generally prefer a 9” or a 7” zipper.
The pocket can be as big as you want but I like to keep my pocket 1” away from all sides. This gives room for seam allowances and won’t interfere with the shape of the bag. I generally hold a tape measure up to my cut-out lining piece to see how big I want the pocket. The pocket needs to be 1” wider than the zipper then add seam allowance. I used a 9” zipper so my pocket width is 11”. The pocket is folded over so double the length then you want and add seam allowance, I made mine 14.5”.
Pieces:
Lining piece
Pocket- 11” X 14.5”
Construction:
1. Mark out the welt pocket shape. On the wrong side of the pocket piece mark a line ¾” from the top of the pocket. Mark another line ½” away from the first line. To finish the box mark lines that are the same size as your zipper. I marked 4.5” away from the center since I used a 9” zipper.

2. Lay the pocket on top of the lining piece right sides together. I eyeball where I want my pocket to sit, mine was about 2” from the top. Just make sure you leave enough room for seam allowance on the top of the lining piece. Pin in place.

3. Sew along the lines of the box. Try to stay on top of the line as much as possible pivoting at the corners.

4. Cut through the middle of the box. I fold the fabric in half to cut through the layers. Stop cutting about ½” from the end of the box.

5. Clip on a diagonal to the corner of the box. Do not cut through the stitching but get as close as you can.
6. Flip the pocket through the hole to the wrong side of the lining. Press Well. If the corners are not laying flat try clipping to the corner a little more. This can require a bit of wrestling the fabric to get it to lay flat.
7. Place your zipper under the welt so you can see the front of the zipper from the front of the lining. Center the zipper the best you can. If the zipper is a little too long I like to line up the zipper stop just inside the window. *Also make sure the zipper pull is in the window, opening the zipper slightly.

8. Top stitch the zipper in place using a zipper foot and 1/8” seam allowance.

From the wrong side, I used a longer zipper than I needed because it was what I had.

9. Fold the pocket up matching the raw edges.

10. Sew the edges of the pocket using a ½” seam allowance. Fold the lining out if the way and only stitch through the pocket layers.
Your welt pocket is finished. Finish sewing your pattern according to the instruction.


Comments